Friday, March 20, 2009

Macerator Vacuum Pump Replacement

The original Macerator (in the center) was kind of nasty looking and didn't work. Turns out 1 of the 2 duckbill valves were in backwards. But judging from the condition, I replaced the Macerator anyway.
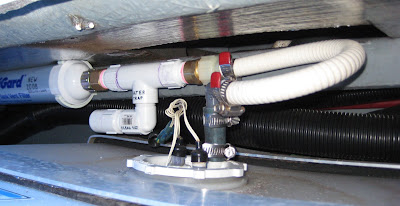
Here's the new one. Much better!

Another view, but notice the "white" inlet hose. It is now heading upwards like it should have. The reason is, if you ever want to do any kind of work on the macerator, the original inlet hose came over from the bottom of the holding tank, stayed low, and then continued to the Macerator inlet.
What's wrong with that picture?
Come on... Sea Ray.
If anything is in the holding tank, which there usually is, Daaa, well it would be able to gravity free flow down to the Macerator. When you replace the duckbill valves inside, you have to take apart the hoses.
Get the picture?
Not a nice atmosphere to be working in.
And how would you clean, flush out, or otherwise winterize this thing in place either?

The bottom hose is the old, original way the inlet hose went.

My new way was to put a "Tee" in-line with a connection at the top for a 3/4" hose line to be able to flush the line and Macerator with antifreeze. The 3/4" hose is not shown yet in this picture. The new tee has to be as high as it can be and about as high as the highest fluid level inside the holding tank.Now it's a "Piece of Cake" to flush, clean and winterize!

Water Heater By-Pass

The original way the water heater was hooked up. The "blue" 15 mm pipe connection in the center is the cold water inlet. A tee in the cold water line also sent cold water to the tempering valve on the upper left side. The tempering valve blends the very hot water in the tank with cold water. You can then near set the tempered water to around 110 degree so nobody burns themselves and also extends the actual amount of hot water available for use.
But to winterize this, you either have to fill the entire hot water heater with 6 gallons of antifreeze - or - disconnect to cold water pipe and connect it to the hot water pipe.
To me, that's cumbersome and ridiculous.
The original tempering valve connection. You can sea I also added a hose from the tank drain valve, down and directly into the bilge. It's brownish / gray in this picture, but I've since then put a clear hose on the tank drain to witness draining. This prevents everything from getting wet when you drain the tank.

The original cold water connection.
In order to install what they call the "by-pass kit", you have to arrange for some additional pipe nipples to fit your application. A "check valve" comes with the kit which gets installed on the hot water outlet side of the water heater, just before the new "tee" for the by-pass.
Now...... to winterize, (after you drain the tank) you just have to rotate the by-pass valve in the cold water supply line to the by-pass position. Remember to turn it back and fill up the tank before you start back up in the spring!
A view of the new water heater "by-pass kit" and the replaced Macerator Vacuum Pump.

Dinette Area - Wiring and Receptacles

I added a convenience 120 Volt and 12 Volt Receptacle in the Dinette Area. This makes it easier to charge cell phones and use the laptop computer.


V Berth - Bose Speakers and Shelving

Port Side. Above the new HDTV. There are several other pictures and views of this located with the TV blog.
Starboard side.

V Berth - Port Side Shelving

Just a convenience shelf to put some more stuff on.
And yes, when we start to fill up the boat in the spring, there is never a "shortage" of "stuff"!
I split the shelf over the 120 Volt receptacle over here. Just so you don't sea the wires as much!

V Berth - Starboard Side Shelving

You can never have enough storage space, shelving or places to put things on a boat. So I added these shelves.

Here's where I added the 12 Volt socket, (black) and the 120 Volt receptacle. We can now use the computer, play games, charge phones, charge the hand held VHF radio, run a 12 volt fan, etc. up here.
In the upper left hand corner is the Carbon Monoxide detector. Now this is another matter that to me is a ploblem area. Carbon Monoxide is a heavy gas and falls lower than air...... So why does Sea Ray mount them high? I know the location of the V Berth is good but mounting it "high" is questionable. So, I added another one of these "low" in the Mid-Cabin.

Thursday, March 19, 2009

Holding Tank Filter - Refill Modification

This is the original way the holding tank filter comes except I already cut the label to start this project. These filters cost between $60 to $85 depending on where you can buy them. After this refill modification which cost about $10, a yearly refill only cost about $4 for the carbon.
I found a bunch of the pellet carbon on-line for $8 and that would last me 2 years. (Actually, I now have enough for 8 years.........) If an average of $70 each per year, over 8 years would be $560. This whole thing cost me less than $40, so I'm over $500 ahead I think!
This refill modification is not my original idea. But I did modify it for my application and did what I feel are some improvements.
Don't forget to click on the pictures for a larger view.

I cut the original filter on one of the sides. That way it makes it easier to fill up with the new carbon pellets. Rather than cut it in the middle and trying to put the 2 halfs together full of pellets.
Looking inside. It is just regular PVC pipe material! Clean it out.
All the items needed for this project.

Holding Tank Filter - Fluid Trap

I'm gonna admit, I feel this fliud trap is gonna be an over-kill. But I won't be able to verify that till next year when I check it and clean it out if necessary? The reason I think it is overkill is because of the vent line "new elbow" and re-orientation that I also did. But, That turned out as an "after effect" because I couldn't mount this fluid trap the same way the original vent line went in. So, my original idea was to intercept any fliud from the tank below from entering the holding tank filter.
These are all the parts for it.
The filter and trap together.

Just the fluid trap.
Just the filter.

Holding Tank Filter - Installed

This is the way the original vent line came off the top of the holding tank. Any spashes from the "fliud" movement in the holding tank below would be able to splash upwards and eventually go - up - and over to the carbon filter to the left. Thus producing that annoying odoriferous product in the surounding air. And when this happens, it is usually at the most in-opportune time!! My fix, (besides the obvious of don't let the tank get that full!) is to put an elbow in there and also add an additional in-line "Fluid Trap".

The finished installation.
The original vent line only.


And the new elbow, new vent line orientation, new fluid trap, and re-filled filter.

UPDATE: Well it has been a full boating season since I installed this. And now in December of 2009, I took apart the fluid trap and there was absolutely nothing in it. That means that the elbow and new hose orientation WORKED! Yeah..........

And the filter itself was fine too. But I will replace the carbon anyway.

Wednesday, March 18, 2009

Cabinet - Control Labels

Well........ I actually got a call from one of the guys interested in buying this boat, his name happens to be Mitch. And Mitch said "YES", he does want the controls labeled.
So here ya go Mitch............


There is just a 12 Volt plug inside the 12 volt socket. I stuck it in there for the moment because it has a little green LED light that lights up and lets me know I not only have the 12 volt power on, but it lights up the area and switches a little to highlight their location in the dark cabinet at night. You can see the little green LED if you click on the picture.

It's COOL!

Electric Panel Labels

Some things are obvious, others are not. When I first got this boat, I did not know how to start the generator. And I did not know how to use the Macerator Pump. The descriptions in the manuals do not match the control panel labels, so I decided to add some more information - hopefully to eliminate some of the guesswork.
One example, is the Generator "PREHEAT / ON" switch actually energizes the electric Choke and Fuel Pump. You need to press this first and then the "START" switch. There is nothing to PREHEAT!!!!
The "START / RUN" switch, starts the starter and remains "ON". It is also the "OFF" switch. I know, more info. than you need to know.....

And who would know that "AC CONVERTER" means "BATTERY CHARGER"? Well I know, and you do now..................

Tuesday, March 17, 2009

HDTV - FINISHED!

I feel I've said enough about the new TV, but here are a few pitures with the Tambour Door finished behind it.


Yeah....... I'm done this project!