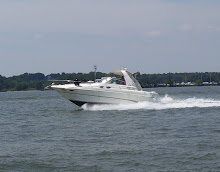
Tuesday, May 3, 2011

We have Sold Our Boat

SOLD the BOAT!

We'll, the first persons to come out and look at her, bought her.

Congratulations to Matt and Dawn on your new boat purchase.

We hope you have as many years of fun on her as we did.

Lee and Dawn

Wednesday, November 3, 2010

NOW FOR SALE

Our boat is now FOR SALE as we have purchased another one.
email: seaharley@gmail.com for details.

Thanks,
Lee

Friday, May 14, 2010

Fresh Water Flush System

This is a water, gallon meter, you set it for about 100 gallons and if a hose or pipe breaks inside, it shuts off. Therefore, the most you can flood your boat is about a 100 gallons which wont sink it!
These are all labeled now.
Left to right.
Heat Pump, Port Engine, Stbd. Engine, Generator.

Underneath. These go to the top of the sight glass strainer that I welded a 3/4" hose fitting onto the top of it.
To flush the system, one at a time, open the corresponding red valve while the engine is running, flush out for a minute or two. You keep the seacock open so any excess pressure will not flood anything and will go back out the intake scupper. City pressure is greater that the pump suction.
Shut engine off, and quickly close valve.
That's it!
Only one hose connection when you get back into port.
No hatches to open, or other hoses to connect or disconnect.
Some of the connections before you install it in the boat.
Just a few pictures.

Wednesday, December 9, 2009

Holding Tank Filter - Update and Follow Up

Since it has been a full boating season for the Holding Tank Filter Modification and Installation done back in March, I decided to follow up with what I found when I checked it at the end of season. The "Fluid Trap" had absolutely nothing in it and the filter itself was fine. That means that the elbow and new hose orientation worked and the fluid trap is not really necessary if you can do that. Otherwise, I'd put in the fluid trap.

And then I decided to check the filter itself. Not bad at all. But I decided to replace the charcoal anyway since I had it apart.

What a piece of Cake!

An easy job that makes sense and saves $80 a year in replacement filter cartridges.

Tuesday, November 10, 2009

I've been busy....

Well yes,......... I've been busy and have done a lot of things.
We did enjoy our boating summer which has kept me from posting and updating this blog.
But... I will update soon.

My latest project is working on a "Fresh Water Engine Flushing System".
It is turning out pretty neat and better than I had expected.
I'm almost done.
And we will be pulling the boat again this year on november 15th, which is this Sunday.
AAahhhhh.... I'm sad another boating season has ended.

Stay tuned as I will be updating soon in a few weeks.

Thursday, May 21, 2009

Rock Fishing, May 20th, 2009

Well a blog about a boat just wouldn't be right without a Fish Story!
Myself and 2 friends managed to pick a fine day out on the water on Wednesday, May 20th, 2009. Flat seas, full tanks of gas, ice, beer, food, and anything else you wanted while fishing.
This is the evening sky on the night before.

Here is Mr. Rich with his first big Rockfish fight. His heart was pounding for about 20 minutes.
His prize, a 34" Rockfish at 8:00 AM.

And then at 10 AM, Mr. Barry got an even bigger fight. Can you sea how far over the rod is bent?

His prize was a 36" Rockfish with a full stomach. Both were very nice fish.
And a Great day on the water.
Click on this photo to get an even bigger idea of how big this fish was.
Now That's..... what I'm talkin bout Willas.....

Thursday, April 16, 2009

Underwater Lights

I added underwater lighting to my trim tabs. The neet thing about this is when the trim tabs are in the up position, the lights are up and out of the water. That way you can change a light bulb if necessary without waiting to pull the boat out of the water. It also helps to minimize any corrosion of the lighting system parts.
When I first designed and installed this in spring of 2008, I had the brackets made and mounted straight "up and down". The light pointed straight back until the tabs went down. There was a little problem as the trim tab travel is not that much and did not allow the light to actually make it all the way down into and underneath the water. They were about half way in the water depending on the about of fuel remaining in the fuel tanks.
So this year, I took them all the way off, bent the brackets a little, re-painted them, and put it all back together again. Now, when the trim tabs are down, the lights are all the way underwater.
Works perfect!
This first picture is the first completed installation in 2008.
Click on the pictures for a larger view.

Starboard side, during installation.

Starboard side, Trim Tab up.
Starboard side, Trim Tab down.

Port side, during installation.

Port side again.
Here is the 2009 redo, the brackets are bent down a little bit and both trim tabs are in the "up" position.

Here, the starboard trim tab is "down" and the port tab is "up".
Here's one with the boat in the water and the trim tabs are in the "up" position.
Last year, 2008, I started with one light a "white" color and the other one with a "blue" color. This was so we could decide which color we liked. Well the white one definitely was brighter and attracted more little fishies underwater.
But we decided and went with the blue ones this year. They just look prettier and have more ambiance to us.
I wired them up to the helm dash panel and put in a new switch to turn the lights on. The new switch went into an accessory blank space. I also put in separate in-line fuses, 1 for each side.

Thursday, April 9, 2009

Galley - New Refrigerator and Grab Bar.

This first picture is the "OLD" refrigerator, grab bar, TV and the way it used to look for comparison. Notice the space above the old refrigerator and the old - longer - grab bar. The new refrigerator was bigger and mostly higher, so the grab bar had to be changed. I put the old grab bar outside in the cockpit and put a new, smaller one inside here.
The new refrigerator fits right up to the underside of the countertop. A basically, perfect fit!


The new refrigerator is about 3 cu. ft. where as the old one was less than 2 cu. ft. A "BIG" difference when it comes to refrigerator storage on a boat. We actually got an extra shelf inside the refrigerator. That relates to extra beer storage! And of course leftovers. This does come with a price. New dual voltage (12 and 120 volt) refrigerators are not cheep. But we had no choice, the old "Norcold" refrigerator crapped out on us. The new one is an Isotherm, Model "Cruise 85". We are liking it.


The new, smaller grab bar.

Galley - Paper Towel and Hand Towel Holders

Believe it or not, there was no place to put towels or paper towels that made any sense.
So I added these.

Galley - Shelf Under Sink

This first picture is just to show you where this area is located. The new shelf is under the sink and behind the round "White Tambour Door". This area does not have a flat bottom as is takes on the contour of the boat hull. So it makes it difficult to store anything practical in there and the stuff ends up all over top of one another. By putting the top shelf in there, it at least takes some of the top layer off of everything and gives a better place for storage.
A place for the pots and pans, cutting board, etc......
Top shelf, with sloping hull bottom. Top shelf, top right side. Top shelf, underneath right side, angle bracket.
Top shelf, top left side.
Top shelf, underneath left side, angle bracket.